Mywifiext | Mywifiext.net Setup | www.mywifiext.net Login
Extenders have become a great need when everyone is doing their work from homes. As there is a need for good signal strength at every corner of the home. With the Netgear extender, it is possible. But, first there is a need to complete the Mywifiext.net Login for the Netgear extender. So, it is very important that you should go with the right steps as it is part of the setup. Therefore, in this blog, you will know about the steps you should follow for the Mywifiext.net Login. So, let’s get started to have all the help that you need to have for the successful login.
Steps To Complete The Mywifiext.net Login
Though, extenders used to save the extra bucks as there is no need to purchase the new connection. But, still there is a need for the setup in order to extend your signal. Therefore, follow the steps mentioned below in order to complete the login and setup in a right way:
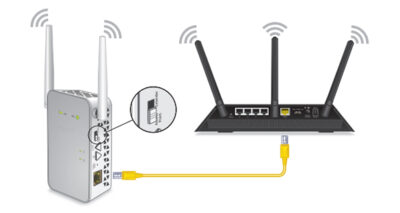
Step 1: Initially, you should connect the Netgear extender to the power source but in the same room of the router.
Step 2: Now, turn on the Netgear extender and the system in which you want to complete the setup.
Step 3: Next, make sure your router is working fine and is in ON state.
Step 4: Now, connect your Netgear extender to the system using the ethernet cable for the uninterrupted login process.
Step 5: After that, open the browser to open the login link, and the setup wizard.
Step 6: Enter the address as the Mywifiext.net Login in the URL field, and hit Enter on the keyboard.
Step 7: This will open the login screen for the Netgear extender.
Step 8: Now, you need to enter the username and password mentioned on the extender in the required fields.
Step 9: Then, click on the login button and the setup wizard will open for the Netgear extender setup.
Step 10: Go with the on-screen instructions to select the network for extension, and complete the setup.
Step 11: Once done, exit from the setup wizard.
Step 12: Now, unplug the Netgear extender from the current location.
Step 13: Connect it somewhere midway between the dead zone and the router.
Step 14: Turn on the Netgear extender again, and make sure the WiFi LED should be green for a good signal.
Step 15: Try to connect your wireless device with the Netgear extender’s network.
Your device got connected successfully. Tada! It means you have completed the Netgear extender’s setup successfully.
Better Signal Reach!
Wrapping up! With the Netgear extenders, you are going to have a better signal reach for your network. Based upon your need, you can select the model of the Netgear extender. So, this is going to cover every corner of your home. The only thing you need to do is to complete the setup using Mywifiext.net Login. For this, the steps are defined above to help you out. In case, there is still a problem, and you need troubleshooting help, so contact us! Our expert team will help you instantly, and you will get your problem resolved. So, have a better signal reach with Netgear extenders!
Read More:- https://mywifiextassist.blogspot.com/2021/07/how-to-complete-orbi-wifi-extender-setup.html


Comments
Post a Comment