Easy Steps For Netgear ac1200 Setup
Wireless Range extenders serve the best when it comes to mitigating issues like poor connectivity, limited Wi-Fi coverage and more. For high-speed internet access, Netgear ac1200 wifi range extender setup is your best option. Netgear extenders offer faster Wi-Fi performance and are compatible with almost every standard Wi-Fi router. The extender uses 2.4 GHz and 5GHz frequency bands to get connected to the router and extend signals for better reach. With Netgear AC1200 you can create a fast lane connection to your router and modem. To know how to set up the extender, read on and proceed with simple steps:

You can complete the Netgear ac1200 setup following two methods:
- Installation assistant.
- WPS push button.
Below, we have discussed both methods in detail.
Netgear ac1200 setup using installation assistant:
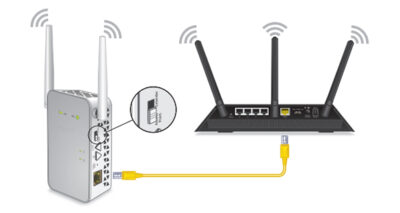
- Place your Netgear extender and the router in the same room.
- Plugin the device to an electric outlet.
- Turn on the devices.
- Now, on your computer, open the ” Wi-Fi manager”.
- Get connected to the extender network.
- Open any preferred web browser on your computer. In the URL box type mywifiext.net and hit the enter button.
- Once you click on the button, the login screen will prompt up.
- Enter the username and password.
- In case, you see a “password incorrect” error appearing on your screen even after multiple attempts, refer to the user manual.
- Proceed with the on-screen instructions to complete the setup process.
After this, unplug the extender and place it somewhere between the area with poor connectivity and router. Your extension must be placed at a distance from radioactive devices like washing machines, microwaves, baby monitors, treadmills etc.
Netgear AC1200 setup With WPS push button
You can use the Wi-Fi protected setup method for setting up your extender. Here are the step by step guidelines to follow:
- Place your extender at some optimal location.
- Turn on the device.
- After this, press the WPS button on your extender.
- When you hit the button, the WPS light will begin to blink. This means the extender is being configured with your router.
- After some time, you will see the ‘Solid Green” lights on your extender. This shows that the extended configuration has been completed.
If you do not see the LED light on your extender, you need to check for the steps again. Once you have completed the setup, you can Unplug the extender and place it anywhere at your home.
That’s All! your Netgear ac1200 setup process has been completed. Now you can enjoy accessing the high-speed internet across any corner of your home without any interruption. All the above-mentioned guidelines are simple to follow and execute. However, if you are still having trouble setting up the extender on your own and need help, you must contact the Netgear extender experts. The professionals will help you to find out the root cause and share the best troubleshooting alternative to fix the issue. Get in touch with the team and set up your extender for the home network without any hassle.


Comments
Post a Comment