Quick Steps to Complete 192.168.1.250 New Extender Setup
There are different IP addresses for different variants of Netgear extenders. For some extenders, 192.168.1.250 is the default IP address. In order to access the settings of the extender, you need to complete the 192.168.1.250 New Extender Setup. After completing the new Netgear extender setup, you can have the super-extended network with the Netgear extender. Before setting up the extender, make sure your extender has the 192.168.1.250 IP address. After confirming the IP address, you can easily log in to your router and extender.
Simple steps for 192.168.1.250 new extender setup
It is very important to follow the right steps to complete the setup to avoid any trouble. Hence, follow the below steps to complete the 192.168.1.250 new extender setup:
Step 1: First of all, unbox your new Netgear extender and plug it into the power socket.
Step 2: Now, power on your Netgear extender and wait for the green LED light on the extender.
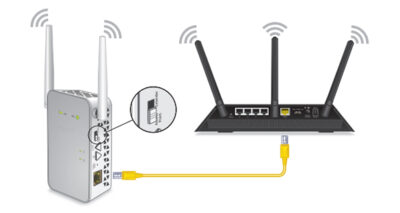
Step 3: After that, take an ethernet cable and connect your Netgear extender to the system through this ethernet cable.
Step 4: Then, open the preferred web browser on your computer system and enter mywifiext.net in the address bar on the web browser.
Step 5: If this link is not working then enter IP address 192.168.1.250 in the address bar and press the enter key.
Step 6: Next, you will be redirected to the login page, where you need to enter default as username and password.
Step 7: Click on the sign-in button and you will be navigated to the setup page.
Step 8: In the next step, the Netgear extender will scan the available WiFi network nearby you.
Step 9: You need to select your main existing WiFi network name from the list and tap on the ok button.
Step 10: If your WiFi network is protected then you need to enter the password for your main network.
Step 11: Then, tap on the continue button to connect the main WiFi network with the Netgear extender.
Step 12: In the next step, you can change the Extender’s network name and other settings by selecting the different options.
Step 13: Now, you need to click on the Finish button to complete the Netgear extender setup.
Step 14: After completing the setup, unplug your Netgear extender from the current point and plug it in a new place.
Step 15: Place your Netgear extender halfway between the router and the WiFi signals dead spot.
Step 16: Now, you can connect your WiFi-enabled devices to Netgear Extender’s network in the weak signal areas.
Step 17: If your device is not connected then make sure that you have a working internet connection and the extender is placed at the right location.
That’s all! Follow the above steps to complete the 192.168.1.250 New Extender Setup and access the network in the dead zone. Be ready to get connected with a super-extended network.


Comments
Post a Comment