How to Do Range Extender Setup with Netgear Installation Assistant?
Are you stuck with the Netgear installation assistant process? Having issues in the Netgear range extender setup? Don’t know how to extend the wireless network? If yes, then don’t worry! The Netgear installation assistant is an amazing way to help you in the Netgear extender setup. With this, you will never face any issue during the setup of the Netgear extender with the wireless router. Once you set up your extender, you can enjoy the high-speed internet connection without facing any difficulty. In this blog, we have shared the simple instructions for the range extender setup with netgear installation assistant. Let’s get started with the extender setup process.

Steps for Range Extender Setup with Netgear Installation Assistant
Go through the below-mentioned instructions for the Netgear range extender setup using the Netgear installation assistant:
Step 1: Initially, you have to place the wireless extender nearer to the power outlet for your wireless router. Turn on the power button and wait for some time until the LED light on the extender turns to green.
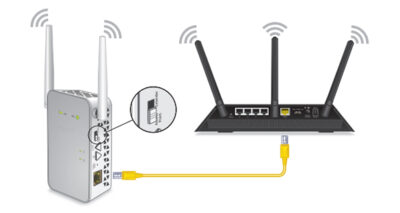
Step 2: After that, connect your WiFi range extender through the WiFi connection. For establishing the connection, you can use the Ethernet cable.
Step 3: If you are using the Ethernet cable then connect one end of the Ethernet cable to the Ethernet port on your computer and the other end to the WiFi extender.
Step 4: For establishing the wireless connection, you need to open the connection manager. Thereafter, locate the network named Netgear_Ext or mywifiext.
Step 5: Go to the web browser of your choice. Enter the IP address 192.168.1.250 in the address bar of the web browser. The range extender setup web page displays on the screen.
Step 6: Once you reach the extender setup webpage, tap on the New extender setup button. Thereafter, you need to enter the required details in the respective fields. Click on the Next button to proceed further.
Step 7: Verify whether the Extender switch/ Access Point is on the extender mode or not. Tap on the Next button.
Step 8: Now, you have to select your WiFi name from the list of the available wireless network. Hit on the Next button. If you want then you can also change the WiFi frequency band.
Note: If you did not want to make any change then clear both of the WiFi bands. There may also be a possibility that the Netgear installation assistant is not working.
Step 9: Enter the security passcode for your chosen wireless network if required.
Step 10: In the next step, set the username and password for your wireless extender.
Step 11: Now, you can connect any of the wireless enabled devices to the new extended network through the SSID or the wireless network and password created by you recently.
Step 12: Once you connect to the new Netgear wireless extended network, you can continue further.
Step 13: Thereafter, you will see the confirmation message that your device is connected to the wireless network.
Step 14: Hit on the Next button to reach the Netgear installation assistant registration webpage. Complete all the required details.
Step 15: Tap on the submit button. You will get a pop-up message on the screen saying extender setup is completed successfully. If you did not want to do registration then click on the skip button.
Step 16: Ensure that you placed the Netgear extender halfway between the router and other devices.
That’s it! We hope by following the above instructions, you can easily complete the range extender setup with netgear installation assistant without facing any difficulty and can access the high-speed internet on any of the WiFi enabled devices.


Comments
Post a Comment