Basic Steps to Do 192.168.1.250 New Extender Setup
There are different variants of the Netgear extender and there are different IP addresses for every variant. Therefore, you need to complete the 192.168.1.250 New Extender Setup process for some Netgear extenders. If you don’t know how to set up a 192.168.1.250 New Netgear extender setup then don’t worry. This blog will help you to perform the 192.168.1.250 new extender setup. To complete the setup process, the only thing you need to confirm is that your Netgear extender has a 192.168.1.250 IP address. Let’s get started.

Steps for 192.168.1.250 new extender setup
If you know the right IP address then it is very easy to complete the setup process. To avoid any trouble, you need to follow the right steps without skipping anything. Hence, below are the steps for 192.168.1.250 new extender setup:
Step 1: First of all, plug your new Netgear extender into the power socket.
Step 2: Then, you need to turn on the Netgear extender and wait for the green LED light on the extender.
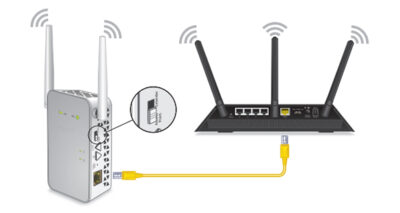
Step 3: Now, take an ethernet cable and connect your new Netgear extender to the system with this cable.
Step 4: After that, open an internet browser of your choice and type www.mywifiext.local in the address bar of the internet browser.
Step 5: If the above link doesn’t work then enter 192.168.1.250 IP address in the address bar.
Step 6: Next, in the login screen, you need to enter the default username and password in the required field.
Step 7: Thereafter, click on the sign-in page and you will be directed to the setup page.
Step 8: Now, the new Netgear extender will search for the available WiFi network present in the area.
Step 9: Then, you need to choose the main existing WiFi network name and tap on the ok button.
Step 10: If your WiFi is not open then you need to enter the password for your main WiFi network.
Step 11: After that, click on the continue button to connect your new Netgear extender to the main WiFi network.
Step 12: In the next step, you can change the extender’s network name if you want to change it.
Step 13: You can change the other settings by selecting different options.
Step 14: Lastly, click on the finish button to complete the new Netgear extender setup.
Step 15: Now, unplug your Netgear extender from the power socket and move it to the new place which is halfway between the main router and WiFi signals dead zone.
Step 16: After that, you can connect any wireless device to the Netgear extender in the weak signal area.
Step 17: If there is a red LED light on your Netgear extender then unplug it and place it closer to the main router.
That’s all! So, complete the 192.168.1.250 New Extender Setup with the above-mentioned steps and access the network in dead zones. Still, if you are facing any issues with the setup procedure, then feel free to contact us.


Comments
Post a Comment