Range Extender Setup with Netgear Installation Assistant
In networking brands, Netgear is on the top. It is a very popular brand among extenders. If you don’t have technical knowledge about the render extender setup. You need not worry about that. In this blog we are going to discuss Range Extender Setup with Netgear Installation Assistant. Range extender setup is an easy process. But sometimes the users feel that it’s tricky. We have mentioned some easy and simple steps for your help. So, read the complete blog carefully and follow all the steps for the range extender setup with Netgear Installation assistant.
Steps for the Range Extender Setup with Netgear Installation assistant
Follow the following step-by-step procedure for the successful Range extender setup with Netgear installation assistant:
- First of all, you have to place the extender near the power supply point.
- Then, turn on the power supply and wait for the solid green light.
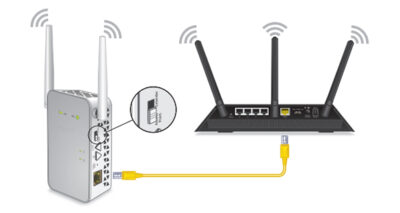
- After switching on the power supply, you have to connect your device by using a wireless connection or by using an ethernet cable. If you are connecting the extender wirelessly then you have to use netgear_ext connection.
- Sometimes, you see a pop-up showing that Netgear won’t connect to the router, then you have to change the WiFi band.
- Now, you have to open the web browser and type the IP address in the address bar of the browser and then press enter.
- An extender setup page will display on your computer screen.
- There you have to click on the “New Extender Setup” option and then you have to enter the details if required and press next.
- In this step, you need to verify your access network switch. After verifying this, you have to click on the continue tab.
- Now you need to select your WiFi name and then click on the “Next” button.
- Then, you have to enter the password to proceed with the next step.
- Thereafter, you have to set your WiFi extender network name and click on the next.
- Now, you are able to connect with your WiFi extender with the login details that you have created.
- Now, you will see a confirmation message on your screen showing that you are successfully connected with your WiFi extender.
- After clicking on the “Next” button you will be redirected to the registration page. Now you have to enter the required details and complete the process.
- You can skip this step if you don’t want to register.
- For a better network experience, place the extender halfway between the router and other devices.
- Finally, the Netgear installation assistant is done successfully.
Hopefully, this blog will help you to Range Extender Setup with Netgear Installation Assistant. This is a very easy process. You can complete the setup by following the above-mentioned steps. If still you are facing any issue with any step then you can contact the customer support center. The technical professionals will help you to resolve your issue.


Comments
Post a Comment