How to Set up New Netgear Extender via Mywifiext
Have you purchased a brand new Netgear extender? Looking for a simple guide for Mywifiext Netgear New Extender Setup? If yes, then this blog is just for you. To set up your new Netgear extender, you need to go to mywifiext.net where you will see a login tab of the new extender setup. After that, you will get an option to create a new account for the Netgear extender setup. Sometimes users face problems with the setup. If you are facing any problems while setting up the Netgear extender then don’t worry. This blog will assist you. Let’s start with the setup process.

Steps to setup new mywifiext Netgear new extender setup
Follow the below-mentioned steps to set up the Netgear extender:
- First of all, you need to connect your extender to the wall socket and wait for the green LED light.
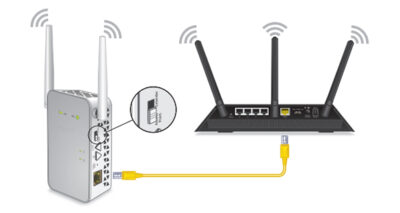
- Now, connect your Netgear extender to the computer through an ethernet cable or WiFi.
- If you are using an ethernet cable then you need to insert one end of the cable in the computer and another end in the extender’s ethernet port.
- If you are connecting through WiFi, then you need to open the WiFi connection manager on your computer, then search for the Netgear_ext network name and connect with it.
- Next, open the web browser and type www.mywifiext.net or 192.168.1.250 in the address bar and press enter key.
- The Netgear extender setup tab will appear on your screen. You need to click on the startup tab to start the setup process.
- After that, you need to enter the details in the required field and then click on the “Next” tab.
- Now, a list of all available networks will display on your computer screen. You need to select the network that you want to extend and then click on the “Next” tab.
- If you don’t want to extend the 2.4 GHz or 5 GHz bands network then clear the checkbox.
- After that, you need to enter the current WiFi password and then tap on the “Next” tab.
- Now, you can set your extender’s network name and password and hit on the “Next” button.
- Next, you need to use your SSID network and password to link your WiFi to the new extender setup.
- Thereafter, verify that your WiFi-enabled computer is successfully paired and then hit on the continue tab.
- Now, you need to click on the “begin” tab.
- A pop-up message will indicate that the extender setup is attached.
- In the next window, you need to select the “current '' option and select the third option.
- Next, a registration page will open, you need to fill all the entails in the registration page and then click on the finish button.
- After that, a status tab will display on your computer screen.
- Now, you can remove the extender and place it in a new place halfway between the router and the area with a weak WiFi network signal.
- Next, you need to connect your extender to the electric outlet and then wait for the orange LED light.
- If there is no orange light on the extender then plug out the extender and try to plug it near the router.
Hopefully, by following the above-mentioned guidelines you can easily set up your New Netgear extender. Mywifiext Netgear New Extender Setup is an easy process. Still, if you are experiencing any trouble, please don’t hesitate to contact our technical experts.


Comments
Post a Comment