Range Extender Setup With Netgear Installation Assistant | Netgear Extender Setup
If you used to work on the internet, then you must know how important it is to have a good range for the network. Moreover, it is very important to have it all over the home. Therefore, it is very important to have the Netgear extender setup these days. You can easily extend the network via Range Extender Setup with Netgear Installation Assistant. Did you get surprised! Well, yes you have read it right. You can complete your setup with the installation assistant as well which means no more failures in the setup. But, how to do this? For this, you will get to know about the steps to complete the Range Extender Setup With Netgear Installation Assistant. Therefore, there is no need to worry and you can extend your network range successfully. So, let’s get started!

Steps To Complete Range Extender Setup With Netgear Installation Assistant
With the range extender setup, you will be able to have a good range of the network. But to complete the setup with the Netgear Installation Assistant, you need to first connect with it. For this, follow the steps as mentioned below and get connected with the extended network:
- In the first step, you need to connect the Netgear extender to the power source.
- Then, turn on the power button for the extender and let the LED light in green color.
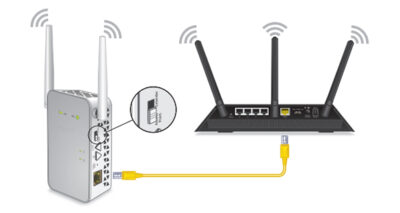
- Make sure you have placed the Netgear extender in the same room as that of the WiFi router.
- Now, connect the Netgear extender with your system using the ethernet cable or the wireless method.
- After that, open the web browser like Google chrome in your system.
- Next, type the address as mywifiext.net in the address field of the browser.
- This will open the Netgear Installation Assistant for the setup of the Netgear WiFi Range extender.
- Next, in the assistant window, click on the New Extender Setup button.
- Fill-in the required details in the field for the setup of the extender.
- After that, first click on the Enter, and then click on the Continue button.
- On the next screen, you will see the list of the available WiFi networks in your range.
- Select the name of your main network, and click on Next.
- Further, enter the password for the main WiFi network, and then again click on Next.
- Then, try to connect any wireless device with the extended network.
- If your device got connected successfully, then click on the Next button.
- You will see the message as your extender is connected and ready to use.
- Click on the Next button again, and then click on the Finish button to quit from the Netgear installation assistant.
In this way, you will complete the range extender setup with the Netgear Installation Assistant and have the full-range network.
Access to Good Network!
Summing up! The Netgear extenders are always recommended for the extension of the network. But, some usually may get confused with the setup procedures. Though, with the help of this blog, you can easily complete the Range Extender Setup with Netgear Installation Assistant. This will not make the setup procedure easy for you but also successful. In case you face any problem with the setup procedure, then you can ask our expert team for help. They will provide you with the instant solution and you will be ready to have access to a good network.


Comments
Post a Comment