How To Have mywifiext Local Setup Success?
Netgear routers and extenders are the most known networking devices these days. It is so because you will find the particular Netgear device as per your need. But, the question is how will you complete mywifiext local setup success? Well, for this, you need to complete the Netgear Extender setup properly with the right steps. Do you know about the right steps for my mywifiext local setup success? There is no need to panic as this blog is going to defne you with the exact steps. So, you just need to follow this guide and complete the extender setup for the extension of your signal successfully. So, let’s take notes for it!

Steps To Have mywifiext Local Setup Success
There are so many guides available for the Netgear Extender setup. But the issue is that they don’t explain the setup procedure properly. Don’t worry! This section of the blog contains the detailed steps for the Netgear extender setup. So, you just need to go with these instructions in order to have set up your Netgear Extender successfully:
- Step 1: Unboxing And Connecting The Netgear Extender
In the first step, you should carefully unbox the Netgear extender from the box. Now, connect the Netgear extender to the power source and press the power button to turn it on. Make sure you connect the Netgear extender near to the system, and also in the range of the WiFi to have uninterrupted setup procedure.
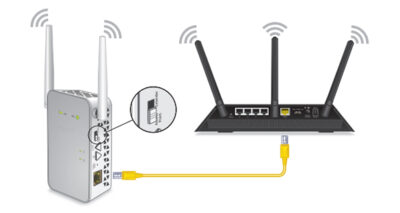
- Step 2: Connect Your System With The Extender’s Network
In the second steps, in order to setup the Netgear extender, you should connect your system with the extender’s network. For this, either you can use the ethernet cable or the wireless network. In case, you use the ethernet cable, connect one end to the system and other end to the extender. Then, for wireless connectivity, look for your Netgear extender SSID in the WiFi networks list, and connect to it. If it asks for the password, then enter the default password mentioned on the Netgear extender.
- Step 3: Reach To Login Page For Netgear Extender
Now, on the successful connection with your system, open any web browser in your system. It is recommended to go with Google Chrome. Then, enter the login link for Netgear Extender i.e. www.mywifiext.net in the URL field. Press enter on keyboard or click on Go. This will open the login screen for the Netgear extender.
- Step 4: Complete The Login For The Netgear Extender
Now, as you are on the Login screen, therefore, complete the login for the Netgear extender. If the Netgear extender is being set up for the first time, then use the default credentials for login. Otherwise, use the current credentials for the login. In case of the first time setup, enter the default username and password as mentioned on your Netgear Extender. After filling up the login details, click on the Login button.
- Step 5: Connect To The Main Existing Network
This will open the Smart Setup Wizard for the Netgear extender. Now, the list will open for available WiFi networks. From that list, you have to select the one for the extension of the network. Select the name of your home network for which you want to extend the signal. After that, if the prompt asks for the WiFi password, then enter that as well and finish the setup. You can change other settings like username or password as well to complete the configuration for your extender.
- Step 6: Placement Of Netgear Extender At Desired Place
As the setup is complete, therefore, now you can unplug the Netgear extender from the current location. Bring the extender to the place where the signal starts getting weak. Then, connect your Netgear extender to the power source there. Make sure that point is in the range of the WiFi. Also, check the WiFi extension LED is in green color. If it is in red color, then move the extender a bit closer to the router. So, connect your wireless device with the extender’s network now.
Tada! These detailed steps will definitely let you complete the mywifiext Local Setup successfully.
Use your Extended Network Without Any Trouble!
In the bottom line, there is no denial of the fact that you will have the mywifiext Local Setup success. These detailed steps will make you get rid of all your confusions about the Netgear extender setup. In case, still, you face any issue in making your mywifiext Local Setup success, contact us. Our team with the expertise in the Netgear extenders will help you with the steps for the setup. So, extend your network successfully, and establish the connection for your devices in any area of your home. So, there will be no dead-zone areas for your network from now onwards. So, access the network anywhere at your home with Netgear extenders and stay connected!


Comments
Post a Comment