How to set up the Netgear N300 WiFi Range?
Everybody wants to have a boosted speed for their network. It happens most of the time, your Wifi router is located on the first storey of the building, and you want to access it from the second, but the strength of the signal along with the speed, is very low. Moreover, it used to get lost in between, and your important meeting may get spoiled. Don't want to imagine this scenario. Don't worry, this issue can be resolved easily with the help of Netgear N300 WiFi Range Extender. This easy-to-use, plug-and-play device will help you out in getting great speed along with the full strength of the signal. This can provide you with a speed of 300 Mbps and it is a quite good speed. The only thing you have to do is to set up the Netgear N300 WiFi Range Extender. The steps for this are explained in detail below.

Steps for Netgear N300 WiFi Range Extender Setup
The steps are quite easy, and if followed properly, you will have no confusion in completing the setup. They are explained in detail here, and by the end of this step-guide, you will be very happy as you are having the boosted signal for your router. So, now, we will have a look at the steps for the setup of the Netgear N300 WiFi Range. So, fasten your seatbelts!
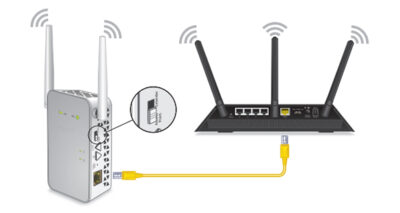
Step 1: As you are starting the setup, it is required to keep the extender near to your WiFi router or in the same room preferably, so that there should not be any fluctuation in the signal during the setup.
Step 2: On supplying the power to the Extender from the electrical outlet, the Power LED light will lit in green color signifying the Extender is ON and in workable condition. If it is not lighting, then press the Power button again for the extender.
Step 3: Now, there is a need to connect the Extender to the existing WiFi network, you want to extend. It could be done in two ways: with the WPS button, or with Smart Setup Wizard.
Step 4: So, in case, you are using a WPS connection to connect to the existing WiFi network, then follow the steps mentioned below:
Hold the WPS button present on the side of the extender. The LED light will blink in green color.
Within 1-2 minutes, hold the WPS button for your existing WiFi router as well. Now, the LED light on the extender will stop blinking and will turn into solid green color. The LED light for your WiFi will also be lit in green color, showing that both the devices are now connected with each other.
Now, on your desired system, look for the new name for your network, ending with _EXT.
Now try to connect the other wireless devices with the network of your extender. In order to connect them, the same password can be used, being used for the existing WiFi network.
Now, as the setup is almost complete. Take the extender from there, and bring it halfway, i.e. in between the distance of your existing router, and the poor area network, so that range could be extended for the network.
You can also use the Router LED light present in the front panel, in order to find the optimal location for the extender. It will light till the extender is in the range.
Now, test the range by using some devices in the poor signal strength region. If it works, then your setup is complete for the Netgear N300 Wifi range extender, and you can skip the further steps.
Step 5: Now, there may be a case when there is no WPS button on your router, which most of the time doesn't happen. In that case, you need to use the Smart Wizard Setup. The steps for that are also easy to follow. You will find them below:
In the very first step for this, from your device, either computer or mobile, connect to the network of your extender. If the light will turn green on the Extender, it means, the device is connected to the extended network.
Now, launch the web browser on the device that you are using for the establishment of the connection and setup.
The browser will open up the Netgear Smart Setup wizard automatically. If in case, it does not redirect you to the Smart wizard, then type "mywifiext.net" in the address bar of your router. Enter admin as the username and password in the field of password. It will open up the wizard.
Now, select the WiFi network name from the list of the available networks that you want to extend, and then click over the Continue button.
Now, the prompt will ask you for the password for your existing network. Enter the same and then click over the Continue button.
For the name field in the prompt, type SSID for your extender network, and then click over the Continue button.
This will apply the setting on your network, and the screen will display showing all the settings for the extended network.
Now, in order to connect any device to the extended WiFi network, open the WiFi Network Manager, and select the extended network name from the list.
Enter the password if the prompt asks.
Put a tick on the Check box given at the last of the Window, and then click over the Continue button.
Now, take the extender from the WiFi Room, and place it somewhere having poor signal strength, must it be in the range of your existing WiFi network.
Now, supply the power to your router, and wait for the light to turn into green color. It may take one minute.
Now, test the signal, by connecting the device from the poor signal area.
With this, your setup is complete for the Netgear N300 WiFi Range Extender. In case, you are having any issue, and are not able to resolve it by yourself. Our expert team is available 24X7 to resolve your issues. You can trust their knowledge, and you will get the best results in the market as they will assist you till you don't complete the Netgear N300 WiFi Range Extender setup.


Comments
Post a Comment